The CV axle boot is a weak link in the final drive systems of four wheel drive ATVs and Side-by-Side vehicles. If the boot is damaged the joint can lose its lubricating grease and pick up debris to contaminate the joint. If the boot damage or deterioration is not addressed it will lead to a much more expensive fix than a boot replacement. If the axle makes a clacking or popping noise, especially when turning, they may be worn out to the point of requiring a rebuild or replacement.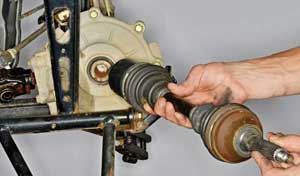

There are three different levels of CV axle service: boot replacement, rebuild and axle replacement. A boot replacement service may be all that is needed to return the vehicle to operation as long as the damaged boot is replaced before the joint bearings have been damaged. The axle will need to either be rebuilt with new components or replaced as a whole if the bearings have worn out or other hard parts have been damaged. Not all OEMs provide spare parts for CV axle rebuilds. Fortunately CV axles are a common component and several companies sell new, re-manufactured and heavy-duty CV axles.
1. Remove the CV axle by gripping it firmly and pulling it straight out of the final drive or differential unit. The inboard end of the axle is secured by a circlip and may take a firm quick pull to free. Inspect the axle seals in the differential or final drive unit and be prepared to replace them if they are in poor condition.
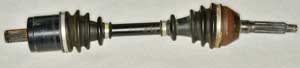
Inspect the axle shaft and splines for damage. Make sure the joints move smoothly. If the joints do not move smoothly the CV joints should be disassembled and inspected further or the axle should be replaced as a unit.
2. The inboard CV joint (long case) is a plunge joint that allows movement along the axis of the axle. This allows the axle to deal with changes of geometry created by the moving suspension. Make sure the inboard joint has smooth plunge movement and the outboard joint does not move in this way.
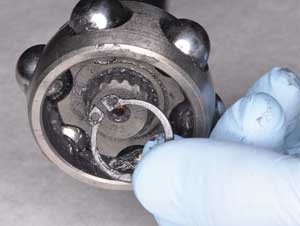
3. Removing the boot clamps and freeing the boots from the joints is required. The plunge joint is often held in place by a large snap ring. Remove this snap ring and free the plunge bearing from its outer race.
4. Remove the snap ring to free the plunge bearing from the axle shaft if necessary.
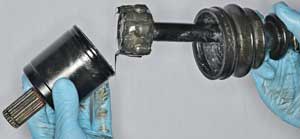
5. Drive the inner bearing race off the shaft if the inner and outer bearing races come off as a set. Only apply force against the inner bearing race to prevent damage to the bearing.
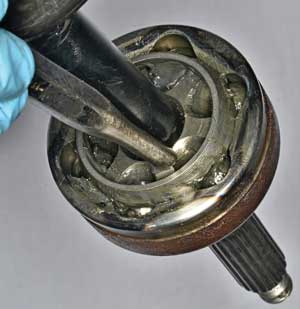
Wipe out the CV and clean it out with contact cleaner to get rid of the remaining old grease. Also, remove any old grease from the axle shaft. Inspect the CV components and replace them as needed. Allow the CV joint to air dry.
6. Thoroughly grease the CV bearings where they contact their races and axle shaft splines. Wipe away any excess grease on the edge of the housing where the boot will slide on.
Assemble the CV axles with new snap rings. Secure the big end of the boot to the CV joint housing. Bleed any excess air from the small end of the boot and install the small end clamp.
Apply grease to the axle seals and splines. Install the axle and previously removed components.
Replacing a CV axle with a new or remanufactured component is certainly the fastest way to get your customer back on their vehicle, but in some cases it can be cheaper, too. OEM prices and parts availability for CV axles can vary dramatically from one brand to the next. Some quick research may show a remanufactured or aftermarket axle makes more economic sense than rebuilding the axle piece by piece in the service department.