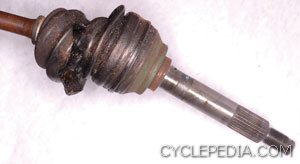

 The constant-velocity joint allows a rotating shaft to transmit power through a variable angle, at constant rotational speed, without any significant increases in friction or play. CV joints are commonly used at ends of the axle halfshafts on four-wheel drive ATVs and side-by-side vehicles.
These joints are very strong and low-maintenance. The most common maintenance item is to check the condition of the rubber boot that covers the joint. If the boot is damaged, the molybdenum disulfide grease with which the joint is packed will be thrown out. The joint will then pick up dirt, water and small rocks causing the joint to overheat and wear. The grease can also contaminate the brakes.
In the worst case, the CV joint may dis-join, causing the vehicle to stop moving or lock up, rendering the vehicle incapable of steering.
Once you have discovered the CV boot is torn or otherwise damaged, it’s important not to operate the vehicle any further, as use of the vehicle will contaminate the CV joint grease, which will result in premature bearing failure. Do the job right, and do it once by remedying the situation as soon as it is noticed.
If the vehicle is excessively dirty, it’s recommended that you clean the area around the boot. It’s imperative to the longevity of CV bearings that you do not get water or dirt into them. If you must wash the vehicle, you should wrap a plastic bag around the torn boot and seal the ends with tape or tie wraps. A clean work environment will limit the chances of contaminating and shortening the life of your CV joint.
Having all the required tools and parts on hand is crucial to the success of any repair job. You should also obtain a quality service manual for the vehicle, as it contains model specific information such as torque specifications, special procedures and safety concerns. A model-specific repair manual is an essential tool that should not be overlooked.
If an OEM CV boot kit is available, this should be your first choice. These parts will cost more but are exact replacements and should provide the best fit. If you are comfortable using aftermarket parts or OEM parts are not readily available, there are some good quality aftermarket kits on the market. These kits are usually a fraction of the cost of OEM but may require some modification to make the parts work. Make sure the kit you buy includes a new rubber boot, two clamps for each end of the boot and about 80 grams of grease.
Remove the axle and the damaged boot. Inspect the axle for damage. Separate the axle from the CV joint.
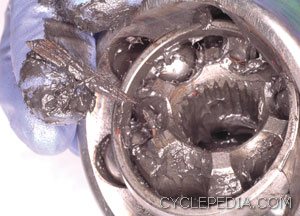
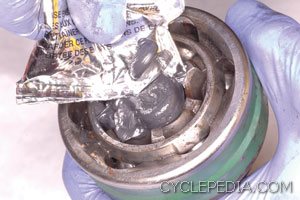
Wipe out the CV as best you can and then clean it out with contact cleaner to get rid of the remaining grease. Remove any old grease from the axle shaft and allow the CV joint to air dry.
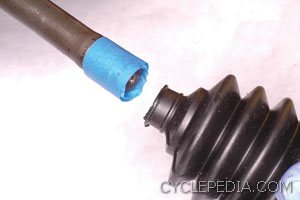
Wrap the shaft splines in tape so the boot can slide over the shaft without being damaged. Apply some of the new grease to the inside of the small end of the replacement boot. Fit the small end of the boot onto the shaft.
Thoroughly grease the CV joint. Particularly concentrate grease in the CV joint where it will make contact with the axle shaft. Wipe away any excess grease on the edge of the housing where the boot will slide on.
Join the axle shaft with the CV joint and secure the large end of the boot to the CV joint housing.
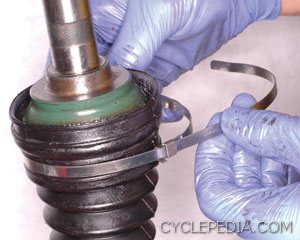
Bleed any excess air from the small end of the boot and install the small end clamp.
Apply grease to the axle seals and splines. Install the axle and previously removed components.
By replacing the CV joint boot at the first opportunity, the owner can avoid the expense of having to replace the axle or creating a dangerous handling machine.
Cyclepedia Press LLC painstakingly publishes online service manuals for many popular ATVs, motorcycles and scooters. Their full-color, online product at www.cyclepedia.com is the first of its kind in the powersports industry. They provide customers with immediate service information. Their time and money saving, online manuals are a great compliment to an Authorized Factory Service Manual.