The Kawasaki Ninja 250 ran from 1986 to 2007 with minimal changes, and Kawasaki sold them like crazy. The 250 was updated in 2008, and the modernized Ninja 300 arrived in 2013. These bikes are reliable and easy to service, but there are some differences over the years. One of the big changes to the little Ninja is the valve train. The 2008 and newer models use a shim under bucket arrangement for valve clearance adjustment. The older models use screw and locknut.
Like most instances of screw and locknut vs. shim adjustment, the service intervals are shorter for the screw and locknut types. The older bikes call for a valve clearance inspection every 6,000 miles, but the newer bikes with shims get an additional 1,500 miles between checks. Also, the 2008 and newer models have done away with the initial valve clearance inspection at 500 miles. While this sounds like a significant reduction in servicing, 7,500 miles between checks is still a short interval for a shim under bucket street bike. The Ninja 650 is double that mileage, but the bigger twin doesn’t have to turn the same kind of rpm as the little bikes to make power.
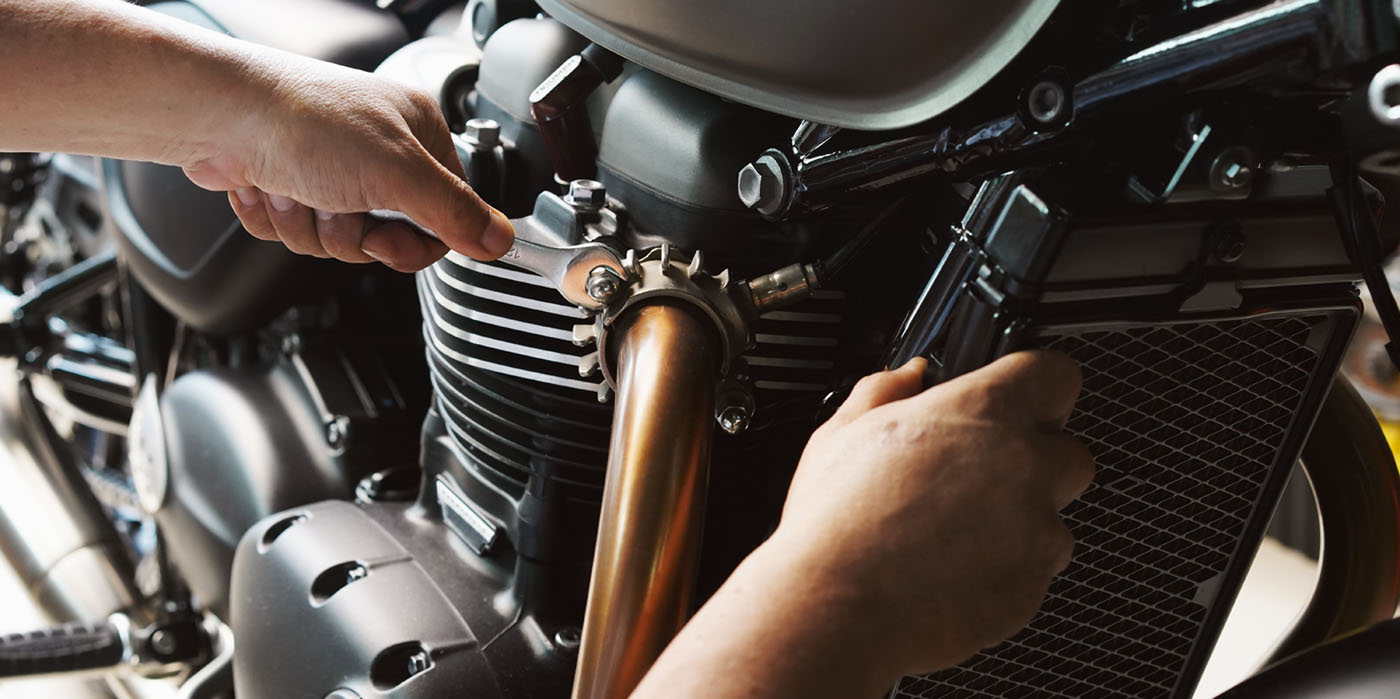
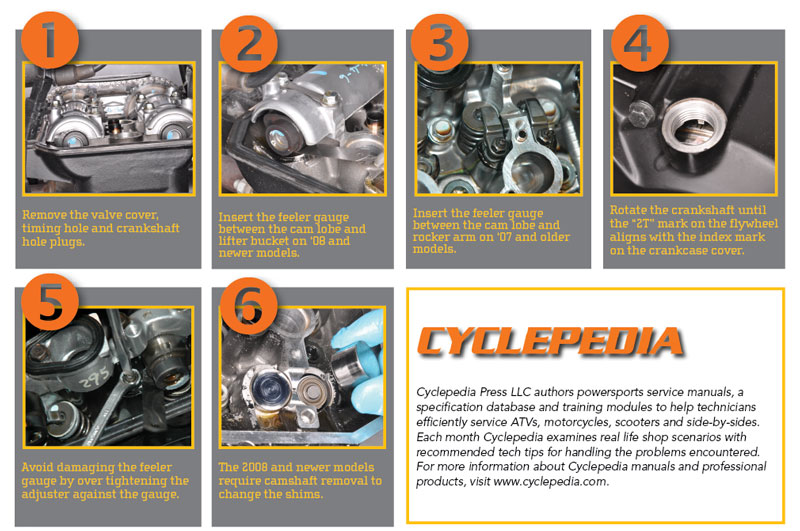
1. The process for valve inspection is similar. Remove the valve cover, timing hole and crankshaft hole plugs. Position left cylinder (No. 1) at TDC on the compression stroke so that the “1T” mark on the flywheel lines up with the mark inside the small timing inspection plug hole and the camshaft lobes of the left cylinder are facing away from each other.
2. Insert the feeler gauge between the cam lobe and lifter bucket on the 2008 and newer models.
3. Insert the feeler gauge between the cam lobe and rocker arm on the on the 2007 and older models. Check the clearance for the all valves of the left cylinder. Record the individual valve clearances on the 2008 and newer models. Go ahead and adjust the valve clearances for the left cylinder as necessary on the 2007 and older models.
4. Rotate the crankshaft until the “2T” mark on the flywheel aligns with the index mark on the crankcase cover. Confirm the right cylinder (No. 2) is at TDC on the compression stroke by making sure its cam lobes are pointing up and not applying pressure to the valves. Measure and/or adjust the valve clearance for the right cylinder as with the left.
5. The screw and locknut valve adjustment can be accomplished without further engine disassembly. On the 2007 and older Ninja 250 models, loosen the nut with a 9mm wrench and turn the adjuster with a flat blade screwdriver to set the gap to middle point of the specified clearance range. Avoid damaging the feeler gauge by over tightening the adjuster against the gauge. Hold the adjuster in place when tightening the locknut.
6. The 2008 and newer models require camshaft removal to change the shims. It is important to keep track of the shim to valve relationship so the replacement shims size can be calculated. The shims should be marked to indicate their thickness. Measure them with a micrometer to double check.
 Calculate the proper shim size needed to put the valve clearance within specification using the following formula:
A = (B – C) + D where, A = new shim size, B = measured valve clearance, C = valve clearance specification, D = present shim size. Select the correct shims for replacement if necessary. Shoot for the center of the valve clearance range, but side with a greater clearance if it is a close call between two different shims.
For both adjustment types, the engine shouldn’t be warm when checking valve clearance. When using a feeler gauge it should have the sensation of a light drag between the two components. If it has a stiff feeling use a smaller gauge.
Always check the valve clearances against the specifications in the service manual. Double check the clearance after
turning the engine over by hand to make sure everything was adjusted correctly.
While many sport bikes have high redline numbers they don’t normally see the sustained high rpm use on the street like the Ninja 250 and 300. These guys have to keep the tachometer pinned to have a good time or even get through traffic at highway speed. So don’t skip the valve clearance checks and the rest of the valve train a look over while its visible.