Linked braking systems on motorcycles and scooters have become more common over the years. Hydraulic systems use proportioning valves, delay valves, and multiple master cylinders to combine the activation of the front and rear brakes in a smooth and logical fashion. Mechanical brake systems use equalizer junctions to link up the cables for the front and rear brakes. It gets interesting when the linked brakes are hydraulic and mechanical.
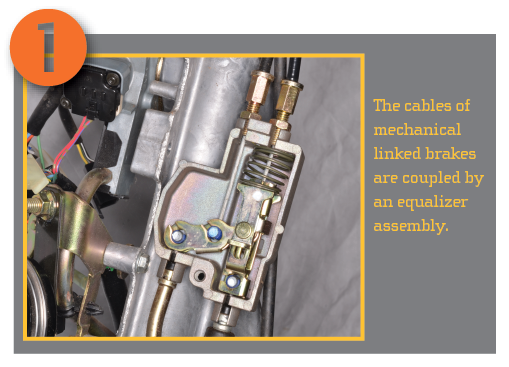 1. Many Honda scooters have combined braking systems with hydraulic disc front brakes and mechanical drum rear brakes. They accomplish the linking in two separate ways. The older and simpler system found on the SH150i and NHX110 Elite models is very much like a linked mechanical setup with an equalizer assembly handling the brake linking.
The rear brake lever is connected to an equalizer assembly. The equalizer assembly pulls on two cables – one that goes to the rear drum brake, and one that runs to a brake arm located under the front brake lever. When the rear brake lever is applied it places a greater pull on the rear drum brake cable, activating the rear drum brake, and lesser pull on the cable that runs to the front brake lever arm applying light pressure to the front brake.
To inspect the combined braking system function on these models first check the front brake is firm and free of air in the hydraulic system. Next, check the rear brake lever free play and adjust it to specification if needed. Make sure the wheels turn easily without the brakes applied, but both the front and rear wheels will be stopped by application of the rear brake lever. Check the clearance between the brake arm and master cylinder with a feeler gauge and make sure the knocker joint that connects the equalizer cable to the brake arm is pulled flush against its pin by the cable at rest. Take slack out of the equalizer cable if needed and recheck the brake arm clearance.
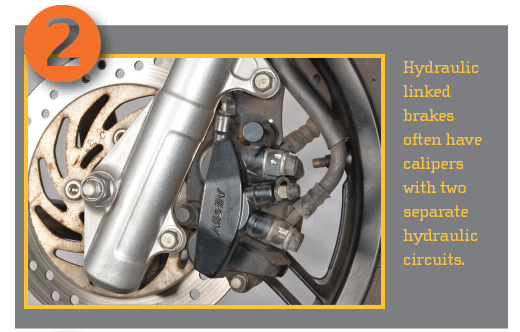 2. Honda’s newer combined mechanical and hydraulic brake system found on the PCX125/150 models shares some features with conventional hydraulic link brakes. This system uses a three piston caliper with two separate hydraulic circuits. The front brake lever and master cylinder control the two outer pistons, but don’t affect the rear drum brake.
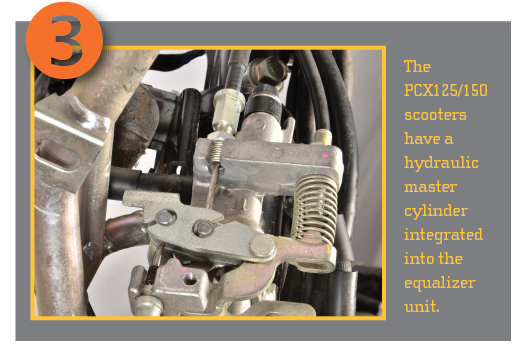 3. The rear brake lever is connected to an equalizer assembly by a cable, but unlike the older system this equalizer unit incorporates a secondary hydraulic master cylinder along with a second cable to the rear drum brake. Only the rear brake is activated by the equalizer when the rear brake lever is squeezed lightly.
When the rear brake lever is squeezed hard it activates the rear drum brake and the secondary master cylinder. This secondary master cylinder controls the middle piston of the front brake caliper so both the front and rear wheels will be braked when the rear brake lever is squeezed hard.
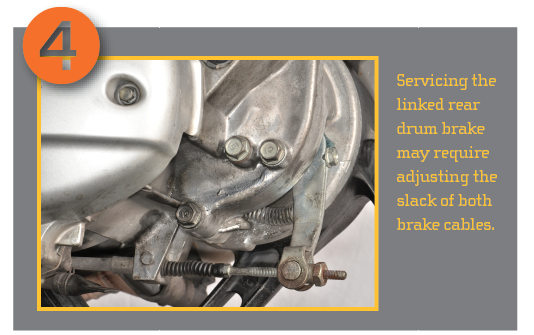 4. When servicing the newer type of combined braking system start (as with the older system) by checking the brake fluid (front and secondary systems), rear brake lever free play, and making sure the rear brake lever will stop the front and rear wheels from rotating. Check the clearance between the equalizer and secondary master cylinder body. If the clearance is too great, remove the rear brake return spring, push the drum brake arm forward and tighten the rear brake adjuster nut until it contacts the brake arm joint pin. This takes the slack out of the second rear brake cable. Install the return spring. Use the cable adjuster on the equalizer to take all of the slack out of the upper brake cable to the lever. Apply the brake several times and recheck the clearance between the equalizer and secondary master cylinder body. Adjust the rear brake lever free play and make sure the rear wheel turns freely without the brake dragging.